Showing posts with label Painting. Show all posts

Monday, May 2, 2016

Tamiya Late Version Tiger 1 update 5

It has been some time but progress has slowly progressed.


Some paint on the figures


Some more paint and some tracks and weathering on the tank. also Some bridge of a diorama in the background


Oh shiny metal look. pencil rubbing and more grime


Some blocks on the back of the bridge. They are made from red das clay


The front of the bridge..no blocks yet. but the beginnings of a base


Cobblestone roadway from the white das clay.
Its all a bit of a mess still but I have some idea of where I`m going with it
The plan is to have some railway tracks running on top of the bridge, if I can successfully scratch build them


Tuesday, February 9, 2016

Pz.Kpfw.I mit Abwurfvorrichtung Update 7

Started a bit of work on a base for my panzer, an old picture frame to start, built up the rough contours with some Styrofoam, coated it in pva and put some das clay on top, added some thin slips of wood around the edges.

Added some stones half buried in the clay and tried out some bulrushes that I made a while back,started shaping the wood around the edges.
I had a little brown paint left in the air brush after painting the camo on my tiger so I sprayed it on. finished shaping the wood on the edges and painted it black.

The star in doing a rehearsal.

Tamiya Late Version Tiger 1 update 4


Sprayed on a bit of camouflage red brown

Then a gloss coat and decals, they have had 3 coats of micro sol so far to try to settle them down on to the contours. 


Monday, February 1, 2016

Tamiya Late Version Tiger 1 update 3

The continuing tale of a Tiger that has gone to the dogs
199 tracks glued up 99 on the right and 100 on the left

I decided that cleaning up the plastic tow cables was not worth it so I cut them out, drilled some holes and and replaced them with some wire

Primed with matt black And covered with Dunkelgelb/ Dark Yellow.
Added some browns to the tracks and a touch of steel they will need some more work once they are in place.


You can hardly see through the forest of wheels
I am debating whether I should add camo colors to the wheels. Probably not though.


Wednesday, January 27, 2016

Pz.Kpfw.I mit Abwurfvorrichtung Update 6

Got the micro set/sol in the post. My first time using them and they are great for settling down the decals.
Painted up the tools and some other details

I added some white oil paint, blended it in with white spirit. I left it a bit streaky to suggest the after effects of rain.

Working on a muddy colored enamel wash.
Most of these effects do not show very well in the photos.

Sunday, January 17, 2016

Pz.Kpfw.I mit Abwurfvorrichtung Update 5

I have made a little progress with the painting though.
I decided to use the only bottle of airbrush primer that I have MIG black. I had not had much success with it previously.

It seemed to go on a little better for me this time.

I went ahead with some painting on the figure
I realised that i had forgotten about the eyes

A quick coat of German Grey on the tank with plenty more to do yet

Sunday, December 20, 2015

Scale Model Church Update 11

I went back and covered the base in das modelling clay . I was not to happy with the surface texture left by the plaster. Then sprayed on some greens and browns

Then white glue and some fine sand to represent gravel around the building
Then more glue and some static grass sprinkled over top.
Then stuck on larger stones as a border between grass and gravel.
a few bits of moss as bushes. And somewhen in there the bell was glued in.


Wednesday, December 16, 2015

Scale Model Church Update 10

I have seen this technique used on plastic models, mainly tanks.
After coating the model in a clear coat of gloss varnish (this needs to be acrylic based) to protect previous layers of paint you place random dots of many colours of oil paint all over the surface.

Then with a brush moistened with white spirits you blend them into the surface, in the process removing most of the oil paint. It should leave a very subtle discolouration which adds some depth to the surface.
Obviously it dose not show well in my photos. You'll have to trust me in that I think it adds to the finish.

The whole church with this effect added. I concentrate a little extra green around the base stones and used some white to lighten the rows of curved tiles.

Tuesday, December 15, 2015

Scale Model Church Update 9 Doors

Basla wood with the opening traced on to it

Shape cut and rounded off with a sanding stick. Then halved.

Boards impressed with a fine pointed pencil. Also tiny bits of plastic cut out for hinges. The plastic came from a model kit of H.M.S. Victory, the bits left over when the sails were cut out. Its for reasons like this that I have trouble throwing away "junk"

Little bits of wire cut off for the barrels of the hinges. Also the doors painted a slightly blotchy red.

Hinges mounted with a little wood glue

The bolts on the hinges were added by lightly touching with a fine brush dipped in wood glue. Repeated in a couple of spots to increase their height.
Hinges painted with gunmetal.
Starting on the handles, tiny beads and brass wire

A drop of wood glue to stick them together.

And another drop on top to bulk them up a bit.
They are being called done at that.

Friday, December 11, 2015

Scale Model Church Update 8

Work on the base for the church has started. Its made from basic Styrofoam covered in wood glue and bonding (some type of plaster) smeared on top.
A quick test for light leakage. not too bad a couple of small spots around the base will need patching to cover some gaps

The building has been dry brushed all over with a slightly off white, bringing all the different shades closer together.

More soon.

Monday, December 7, 2015

Scale Model Church Update 7

Just painting all the blockwork in the many shades of gray
Right now it looks a bit too patchwork .

But with a little dry brushing you get a bit of unification of the colors.

Saturday, December 5, 2015

Scale Model Church Update 6

Things a proceeding at a quicker pace
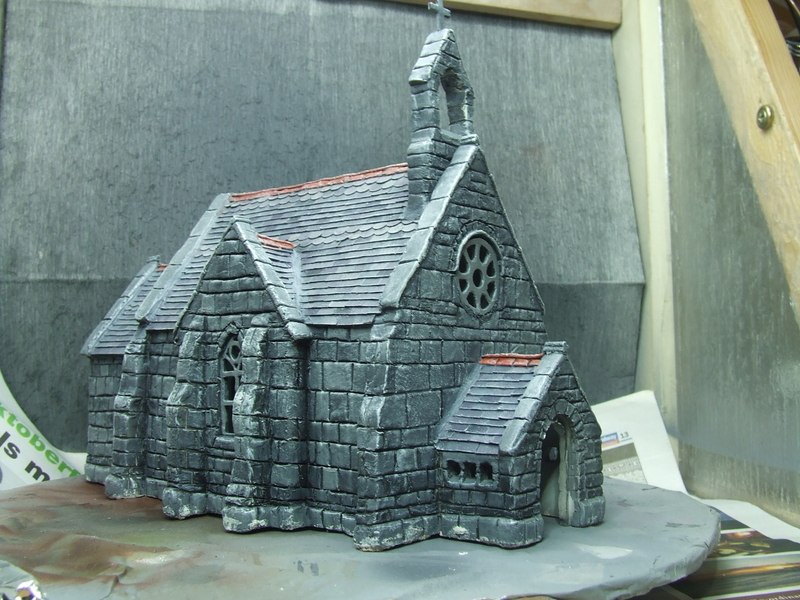
Finished up the roof by adding the ridge tiles. Then sprayed everything in black acrylic primer.

Then sprayed a light coat of gray at an angle to bring out the detail.
Followed by pickin out the individual tiles in various shades of slate, touches of purple, gray, black and sand combined in varying amounts.

And mixed up a terracotta shade for the ridge tiles. Once its fully dry we will bring it all together with a mix of washes and dry brushing.
Also the flashing on yje joins needs a touch of a lead colour.

More soon.